

On this page
A Unity project usually starts with direct references: a scene points at its prefabs and a manager holds every level. All of it ships inside the app, and a scene loads everything it references when it opens. To add a level, you build a new app and wait for store review.
Addressables replace those references with addresses: you load an asset when you need it, release it when you are done, and decide per group whether it ships in the app or downloads from a server. By the end, you can set up a project, load assets without leaks, and host remote content on Unity's Cloud Content Delivery (CCD).
Everything here is written for Unity 6.3 LTS (6000.3) with Addressables 2.10.3, the version the Unity 6.3 manual lists.
How Addressables find and load an asset
Three pieces do the work. An address is a string you give an asset, such as enemies/goblin. A group decides how its assets are packed into AssetBundles and where those bundles are built and loaded from. The content catalog, written by every Addressables build, maps each address to the bundle that holds the asset.
The Addressables introduction puts it this way: the resource manager looks up the address in the catalog to find where the asset is stored, then loads the asset and its dependencies, "downloading the content first, if necessary". Because your code only knows the address, you can move an asset to another group, or from the app to a server, without touching the code that loads it.
Every load runs the same sequence: look up the locations for the key, gather the dependencies, download any remote bundles that are missing, load the bundles into memory, and hand you the result. The key does not have to be an address; a label or an AssetReference works too.
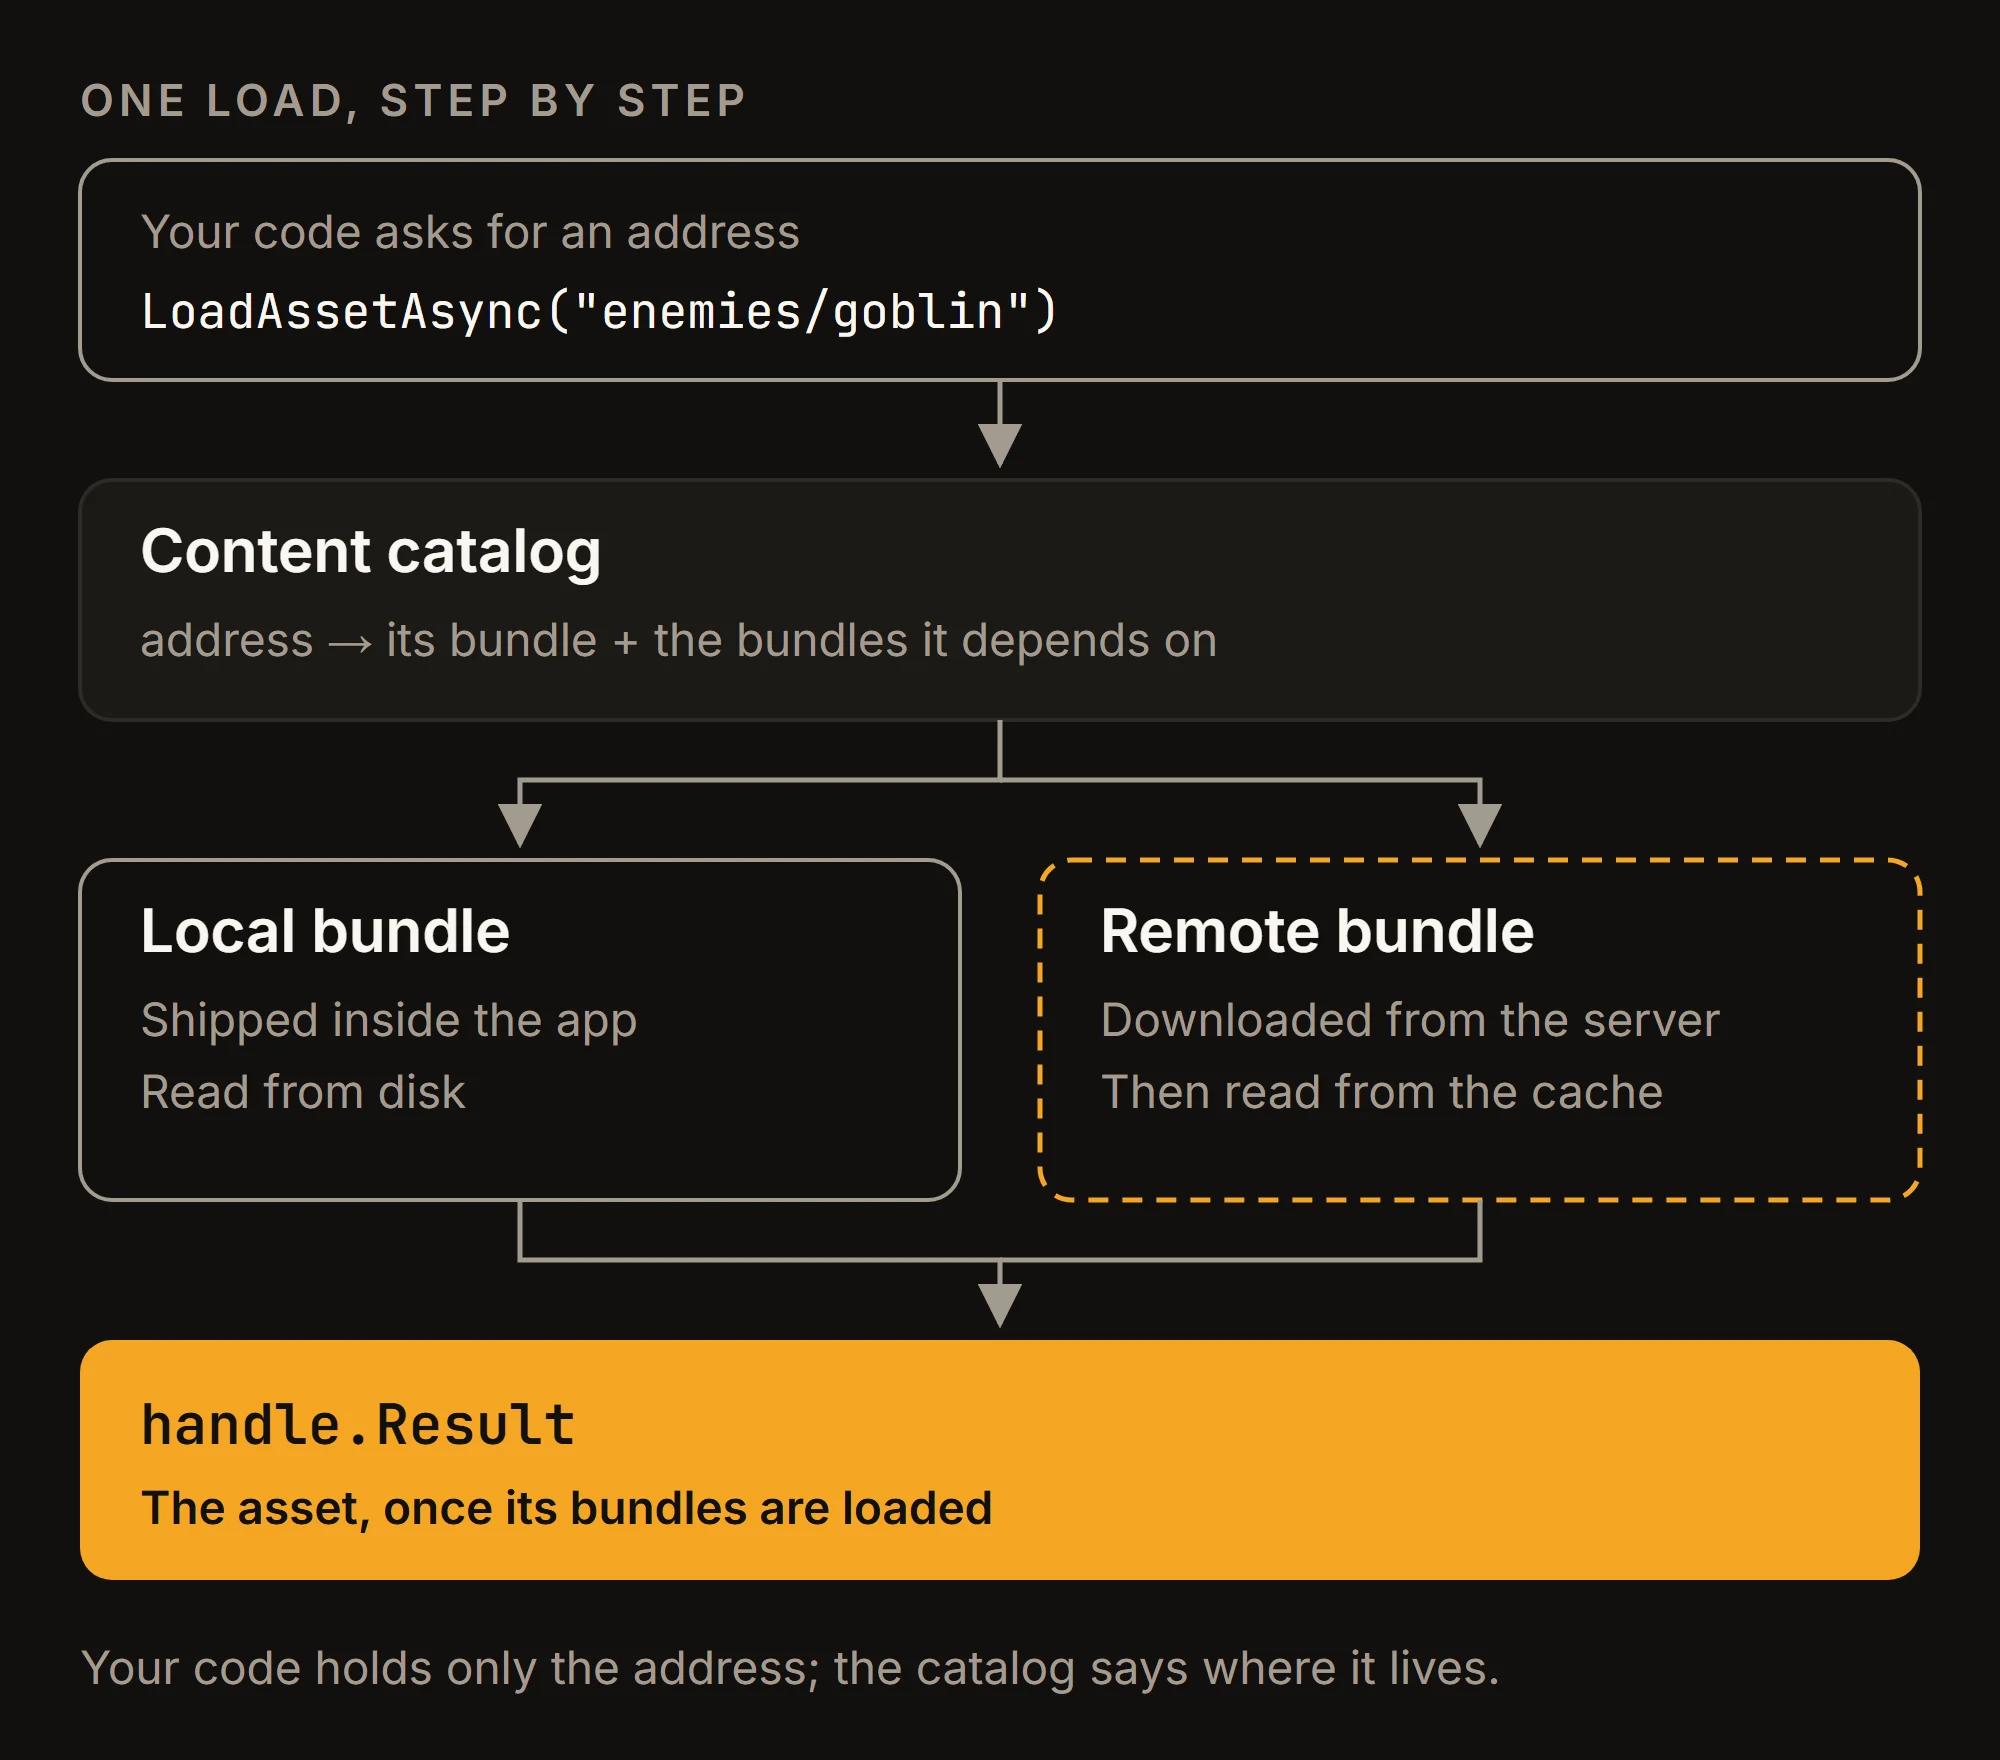
All of this is asynchronous. A load returns an AsyncOperationHandle right away, and the asset arrives at least one frame later the first time you load it.
Setting up a project
Install the package first. In the Package Manager, find Addressables in the Unity Registry, or add it by name (com.unity.addressables). Then, as the install guide describes:
- Open Window > Asset Management > Addressables > Groups.
- Select Create Addressables Settings.
This creates an AddressableAssetsData folder under Assets with the settings, groups and profiles. Commit the whole folder to version control: your teammates and your build machine need the same setup.
Mark assets as Addressable
There are three ways to add an asset to a group: drag it from the Project window into a group in the Groups window, drag it between groups, or tick Addressable at the top of its Inspector. The Inspector checkbox puts it in the default group, and you can pick another group there.
Give each asset a short, stable address, such as ui/shop-icon instead of a long folder path. Then add labels for assets you want to treat together: preload for what must be on the device before the first match, or level-1 for everything that level uses. One asset can carry several labels.
Addressable assets cannot live in a Resources folder; Addressables moves them out when you add them. To make a new group, use New > Packed Asset in the Groups window: the Packed Assets template includes the settings the default build scripts need.
Play Mode Scripts
The Play Mode Script menu in the Groups window decides how the Editor loads assets in Play mode. Addressables 2.10 offers two options:
- Use Asset Database: loads straight from the project, with no build needed. Use it day to day.
- Use Existing Build: loads from bundles built earlier. You must build the content first, and remote content must be reachable at the profile's remote load path.
Use Asset Database is fast, but the profile docs warn that it "can hide group configuration and asset assignment mistakes". Switch to Use Existing Build before you ship a change.
Build the content
Build the bundles from the Groups window with Build > New Build > Default Build Script. Local bundles are copied into the app when you build the player. Remote bundles go to the remote build path, ServerData/<BuildTarget> by default, from where you upload them.
The Build Addressables on Player Build setting builds the content with every player build. That is convenient, but it rebuilds the content even when nothing changed. On a large project, turn it off and build the content on its own when it changes.
Loading and releasing assets
Every load gives you a handle, and every handle must be released when you are done with it. The unloading page is blunt about it: "you must release every asset that you load or instantiate when you're finished with it."
The simplest case loads one asset by address and releases it when the object that uses it goes away:
using UnityEngine;
using UnityEngine.AddressableAssets;
using UnityEngine.ResourceManagement.AsyncOperations;

public class ShopIcon : MonoBehaviour
{
    [SerializeField] SpriteRenderer target;
    AsyncOperationHandle<Sprite> iconHandle;

    void Start()
    {
        iconHandle = Addressables.LoadAssetAsync<Sprite>("ui/shop-icon");
        iconHandle.Completed += handle =>
        {
            if (handle.Status == AsyncOperationStatus.Succeeded)
                target.sprite = handle.Result;
            else
                Debug.LogError($"[{nameof(ShopIcon)}] Failed to load icon: {handle.OperationException}");
        };
    }

    void OnDestroy()
    {
        if (iconHandle.IsValid())
            iconHandle.Release();
    }
}
A failed load does not throw: it sets the status to Failed and stores the error in OperationException. Always check the status before you use Result.
Instantiate prefabs
For prefabs, use Addressables.InstantiateAsync. It loads the prefab and creates an instance, and with its default trackHandle = true you release the instance with Addressables.ReleaseInstance, which also destroys it. Pair them: every instance created by InstantiateAsync goes away with one ReleaseInstance.
Reference assets from the Inspector
Typing addresses as strings is fragile. An AssetReference field lets you drag an Addressable asset onto a component in the Inspector, and typed versions such as AssetReferenceGameObject stop you from assigning the wrong type:
public class EnemySpawner : MonoBehaviour
{
    [SerializeField] AssetReferenceGameObject enemyPrefab;

    public void Spawn(Vector3 position)
    {
        Addressables.InstantiateAsync(enemyPrefab, position, Quaternion.identity);
    }

    public void Despawn(GameObject enemy)
    {
        Addressables.ReleaseInstance(enemy);
    }
}
An AssetReference also has its own LoadAssetAsync and ReleaseAsset, but the API reference notes that it "cannot be used a second time until the first load is released". To spawn many copies, pass the reference to Addressables.InstantiateAsync as above.
Load a set of assets by label
LoadAssetsAsync loads every asset that matches a key. With a list of labels, a merge mode decides how they combine: Union takes assets with any label, Intersection only assets with all of them. This snippet, from a LevelAudio component, loads the music clips of the first level:
var musicHandle = Addressables.LoadAssetsAsync<AudioClip>(
    new[] { "music", "level-1" },
    clip => Debug.Log($"[{nameof(LevelAudio)}] Loaded clip: {clip.name}"),
    Addressables.MergeMode.Intersection);

// Later, when the level unloads:
musicHandle.Release();
One handle holds all the clips, so one Release frees them together.
Memory and reference counting
Addressables count references. Each load adds one to the count of the asset and of the bundles it needs, and each release takes one away. The memory page explains the part that surprises people: when an asset's count reaches zero, its memory is not freed yet. Memory comes back only when the whole bundle is unloaded, which happens when no asset in that bundle is in use. In the docs' own words, "you can't unload part of an AssetBundle."
Picture a bundle with a goblin and a troll. You release the goblin, but the troll is still on screen, so the bundle stays loaded and the goblin's textures stay in memory with it. Only when the troll is released too does the bundle unload, and both are freed.
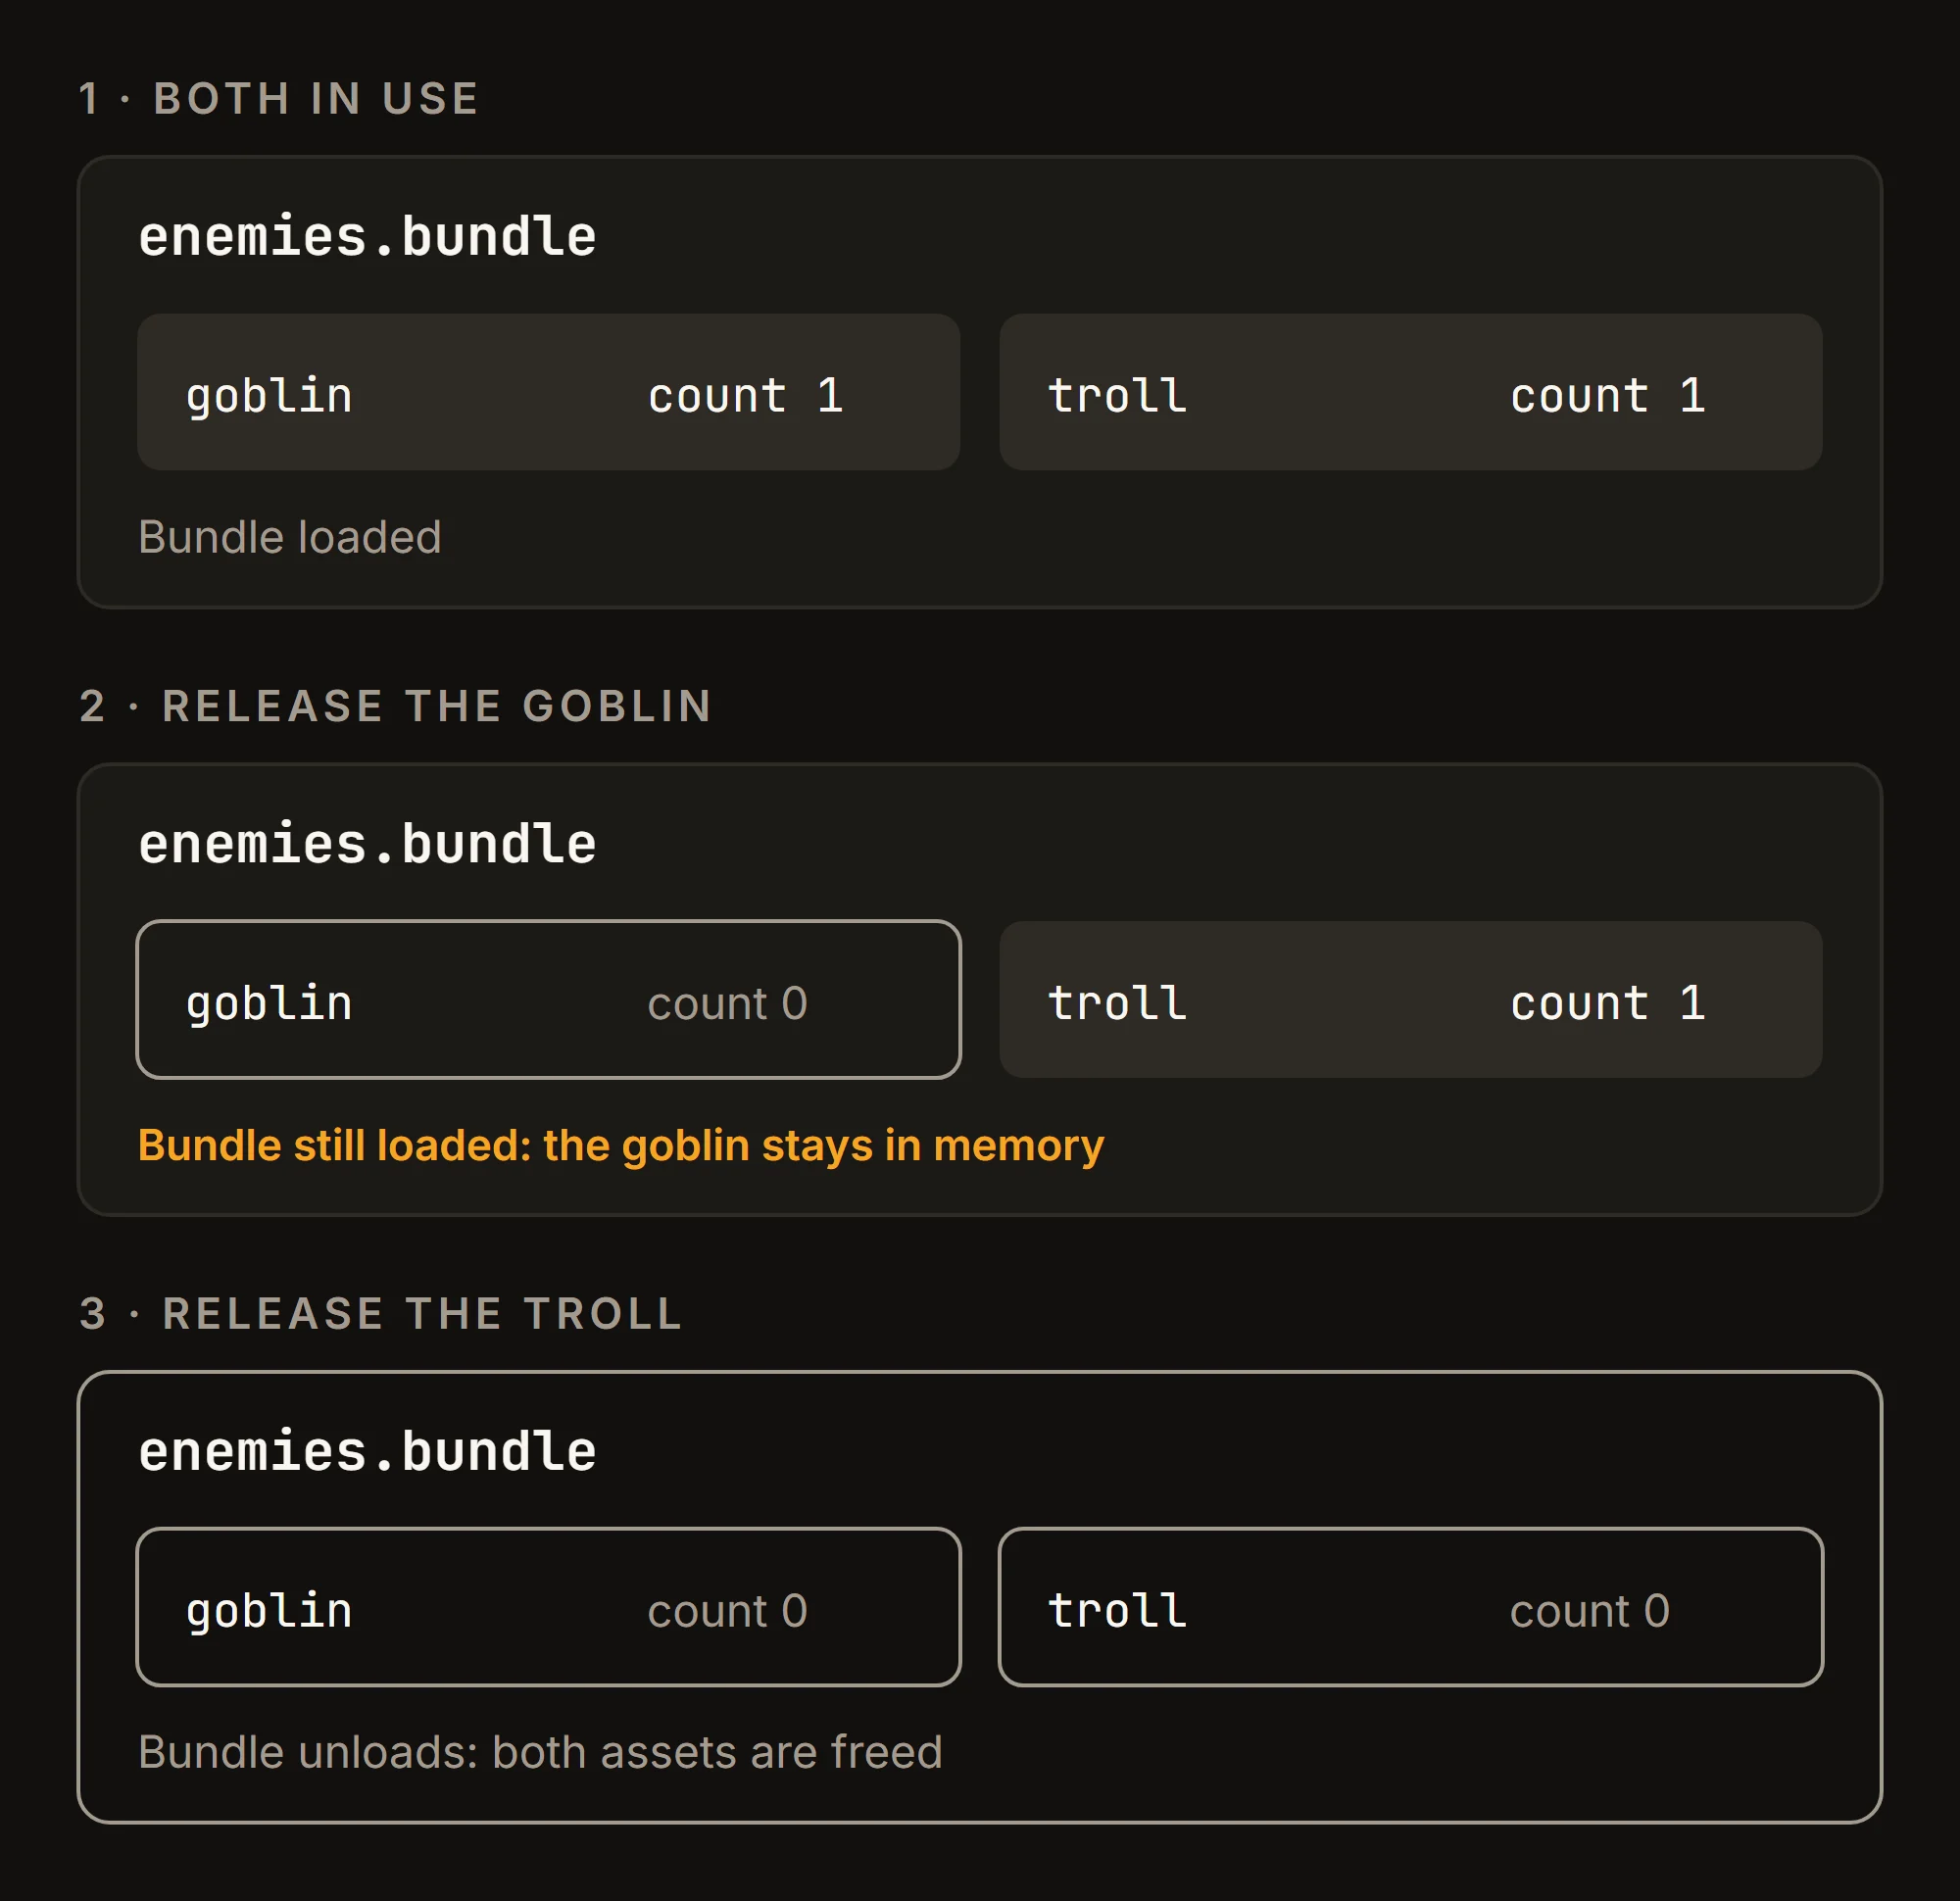
Two consequences follow. A forgotten Release keeps a whole bundle alive, not just one asset. And a huge bundle shared by many screens may never unload, because something in it is always in use. The bundle memory page frames the trade-off: fewer, larger bundles minimize total memory overhead, while many small bundles minimize peak memory because Unity can unload them sooner.
To see what is loaded, use the Addressables Profiler module. Enable Debug Build Layout in the Addressables preferences, build the content, switch the Play Mode Script to Use Existing Build, then open Window > Analysis > Profiler and enable the Addressable Assets module. It shows the bundles, assets, scenes and catalogs loaded in each frame. It does not work with Use Asset Database. The older Event Viewer was removed in Addressables 2.0.3.
Organizing groups and bundles
A group's Bundle Mode decides how many bundles it becomes. The group settings reference lists three options:
- Pack Together: one bundle for the whole group.
- Pack Separately: one bundle per primary asset in the group; sub-assets, such as the sprites of a sheet, stay together.
- Pack Together By Label: one bundle per combination of labels. Assets labeled
catordogandsmallorlargegive four bundles.
A practical starting point is to group by what loads and unloads together: one group per level, one for the UI, one for content the first session needs. Assets that always appear together can share a bundle. Assets that appear on their own, such as character skins a player picks one at a time, are better packed separately.
Duplicate dependencies
Duplicates are easy to create without noticing. When two Addressable assets in different bundles reference the same asset that is not Addressable, Unity copies that asset into both bundles. The dependency page lists the results: several instances of the same asset at runtime, and higher memory use and build size.
Say a goblin prefab and a troll prefab sit in different groups and share a skin texture that nobody marked as Addressable. Each bundle gets its own copy, and loading both enemies loads the texture twice. The fix is to make the skin texture Addressable and put it in its own group (or with one of the prefabs), so both bundles depend on one copy.
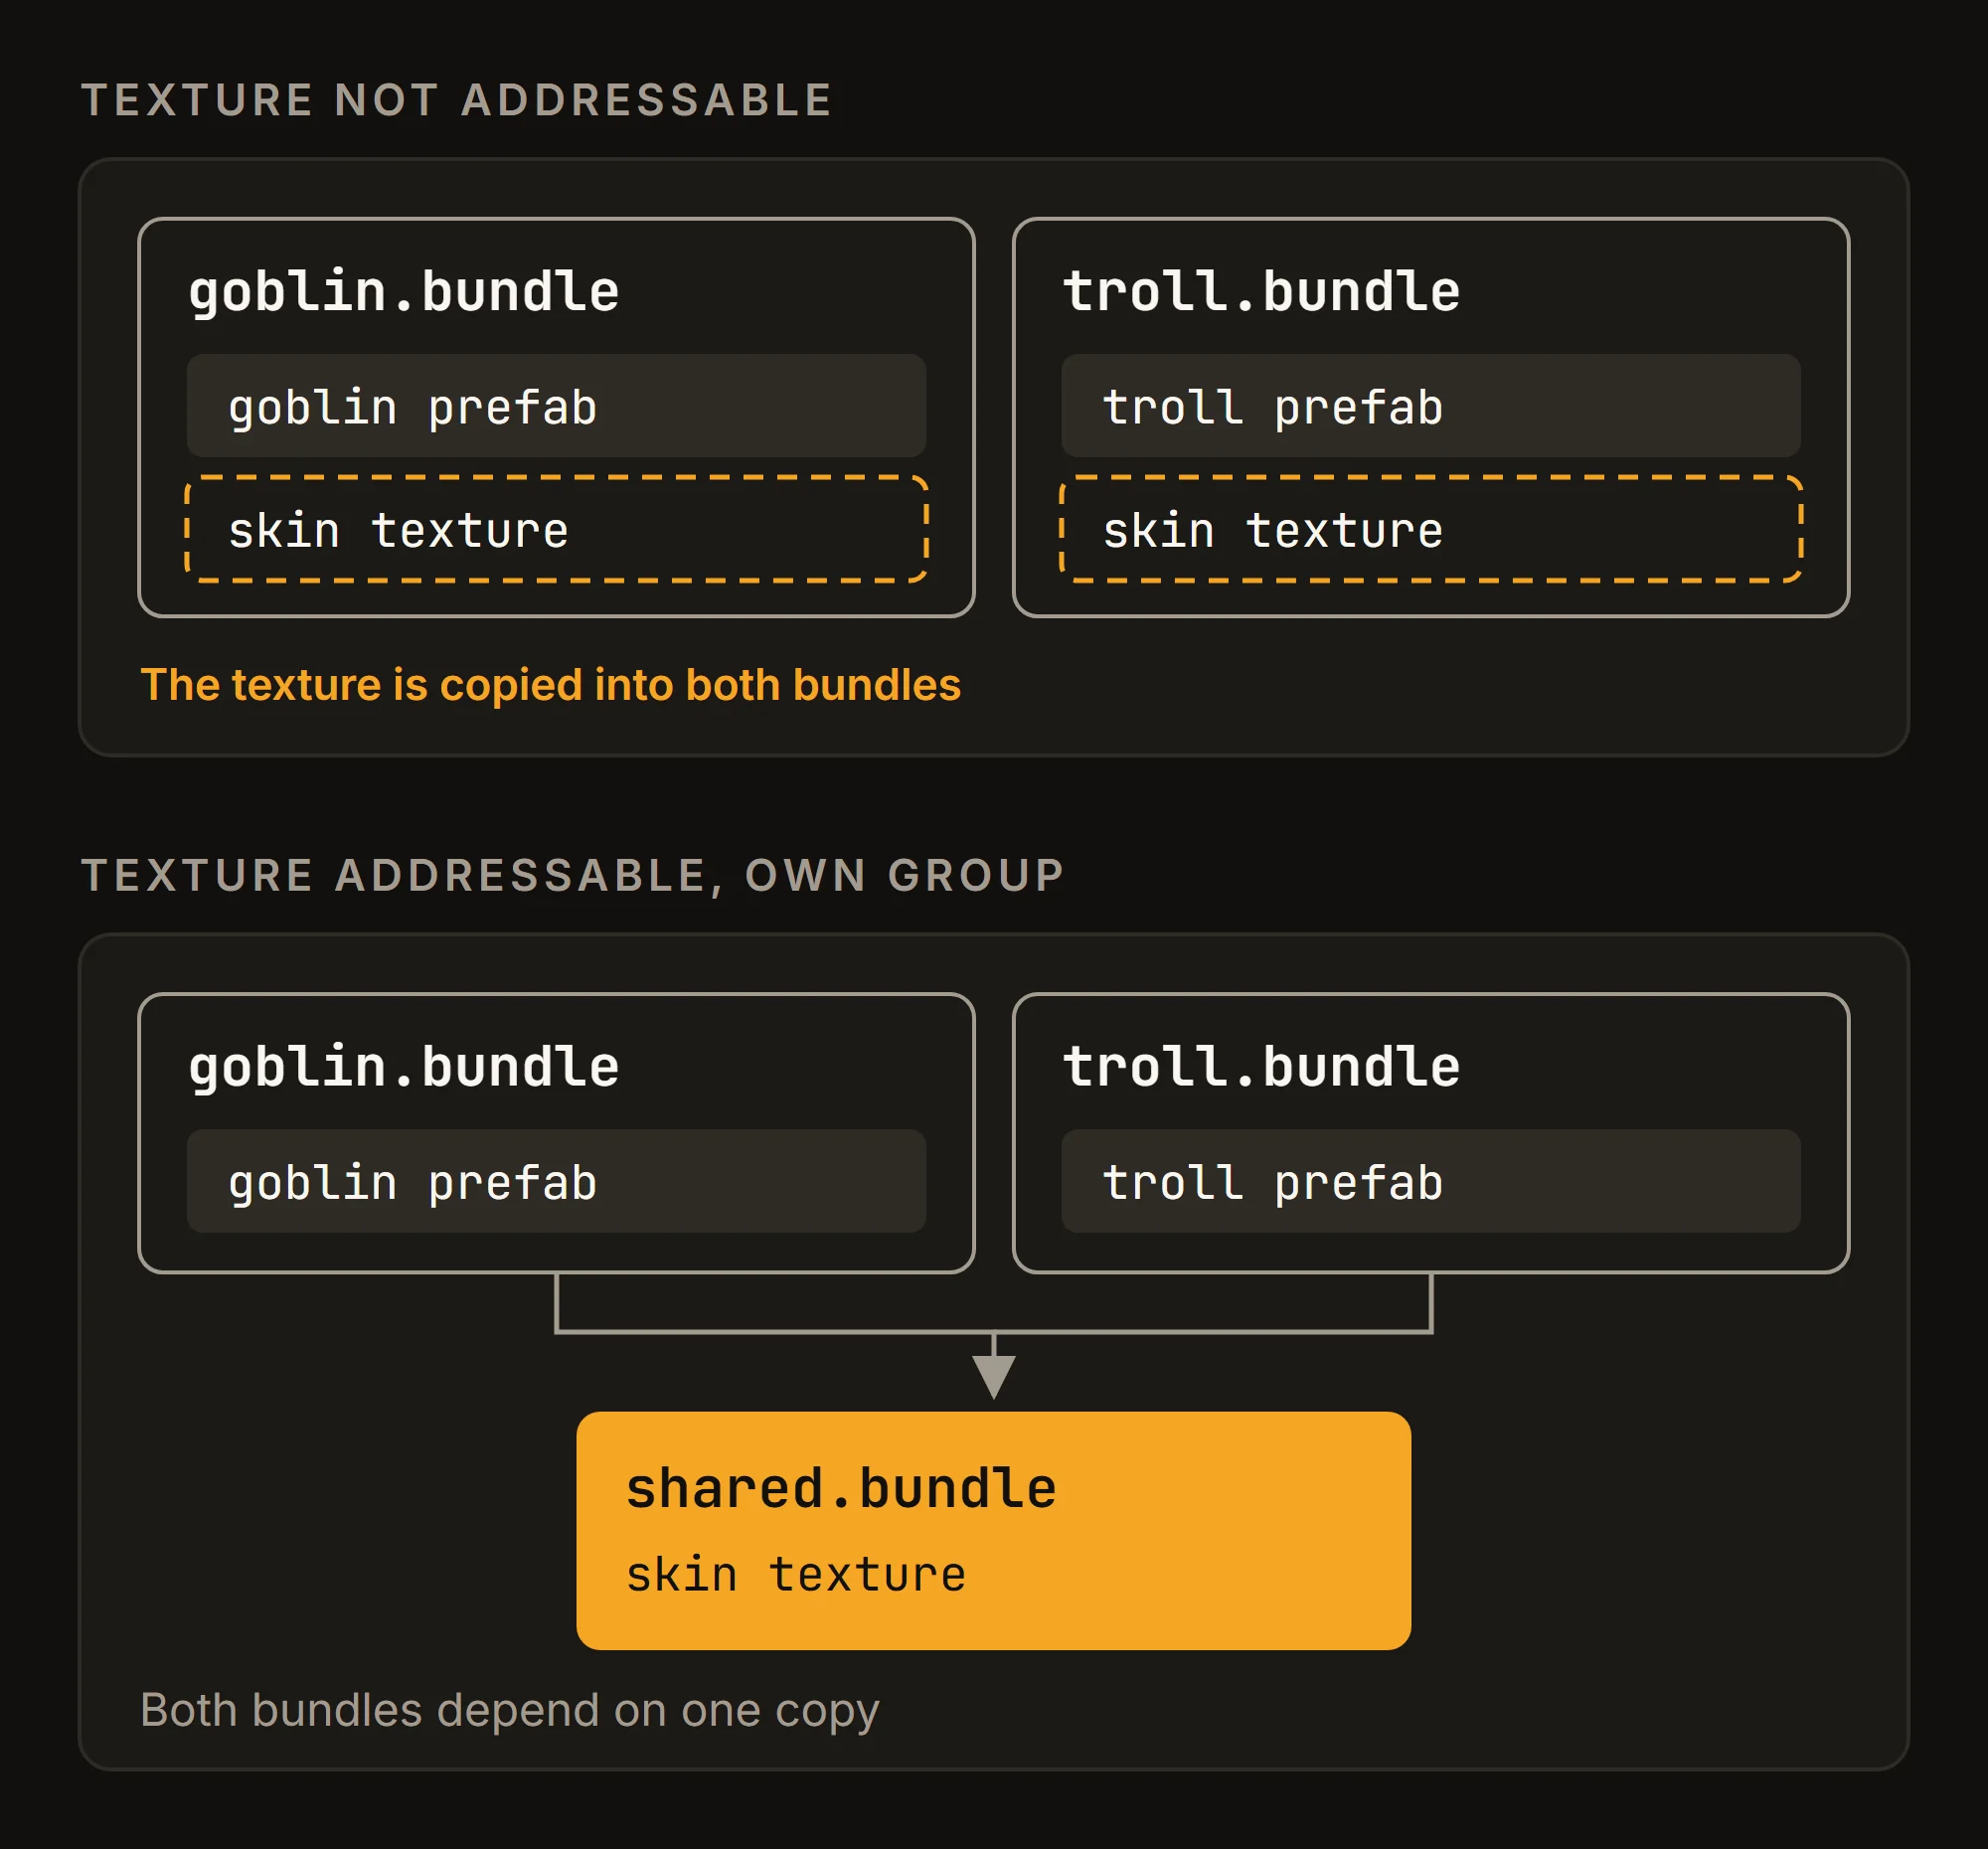
The fix has a cost of its own. Loading an asset loads every bundle its bundle depends on, and Addressables track that per bundle, not per asset: if one asset in bundle A references bundle B, loading any asset from A also loads B. Keep the links between bundles simple.
Find problems with Analyze and the build report
You do not have to hunt for duplicates by hand. Open Window > Asset Management > Addressables > Analyze and run Check Duplicate Bundle Dependencies. It is a fixable rule, so Fix Selected Rules can resolve what it finds. It needs a full build, so it takes a while on a large project. Two more rules find assets duplicated between Addressables and the scenes in your Scene List or the Resources folders.
For the full picture, enable Debug Build Layout in the Addressables preferences. Each build then writes a build report with every bundle, its size and its dependencies, which you open in the Addressables Report window.
Compression and caching
Each group picks a compression format for its bundles. The group settings reference describes them:
- LZ4 (the default): chunk-based, so Unity can read part of a bundle without decompressing all of it. A safe choice for local content.
- Uncompressed: largest on disk and fastest to load. Worth it for local content when the app size allows.
- LZMA: smallest files but slow to load. The docs advise to "use LZMA for all remote content, but not for any local content". Downloaded LZMA bundles are recompressed when they are stored in the cache, which avoids the slow loads later.
The rule of thumb that falls out: LZ4 for groups that ship in the app, LZMA for groups that players download.
The AssetBundle cache
Remote bundles are cached on the device after they are downloaded, and they are downloaded again only if they are updated or deleted from the cache. This is controlled per group by Use Asset Bundle Cache under Advanced Options. If you turn it off, a remote bundle stays in memory until you unload it and is downloaded again the next time.
Over time, updates leave old bundles in the cache that the current catalog no longer uses. On a phone with little storage that matters. You have three tools:
Addressables.CleanBundleCacheremoves cache entries the loaded catalogs no longer reference. Call it after Addressables initialize or after you load extra catalogs, and release the handle it returns.UpdateCatalogswithautoCleanBundleCacheset totruecleans up right after a catalog update.Caching.ClearCachedeletes the whole cache, for a "clear downloaded data" button in settings.
Hosting remote content on Cloud Content Delivery
So far everything has shipped in the app. To download content instead, you need a server, and Unity's own is Cloud Content Delivery. Its four ideas map onto Addressables like this:
- Bucket: a place for files, usually one per platform (
android,ios) in each environment. Every project starts with aproductionenvironment. - Entry: one uploaded file, such as a
.bundleor the catalog. - Release: a snapshot of all the entries in a bucket at one moment.
- Badge: a name that points at one release. The app downloads by badge, and CCD adds a
latestbadge to the newest release automatically.
On the pricing page, as listed on 2026-10-14, CCD bandwidth is free up to 50 GB a month and $0.08 per GB after that.
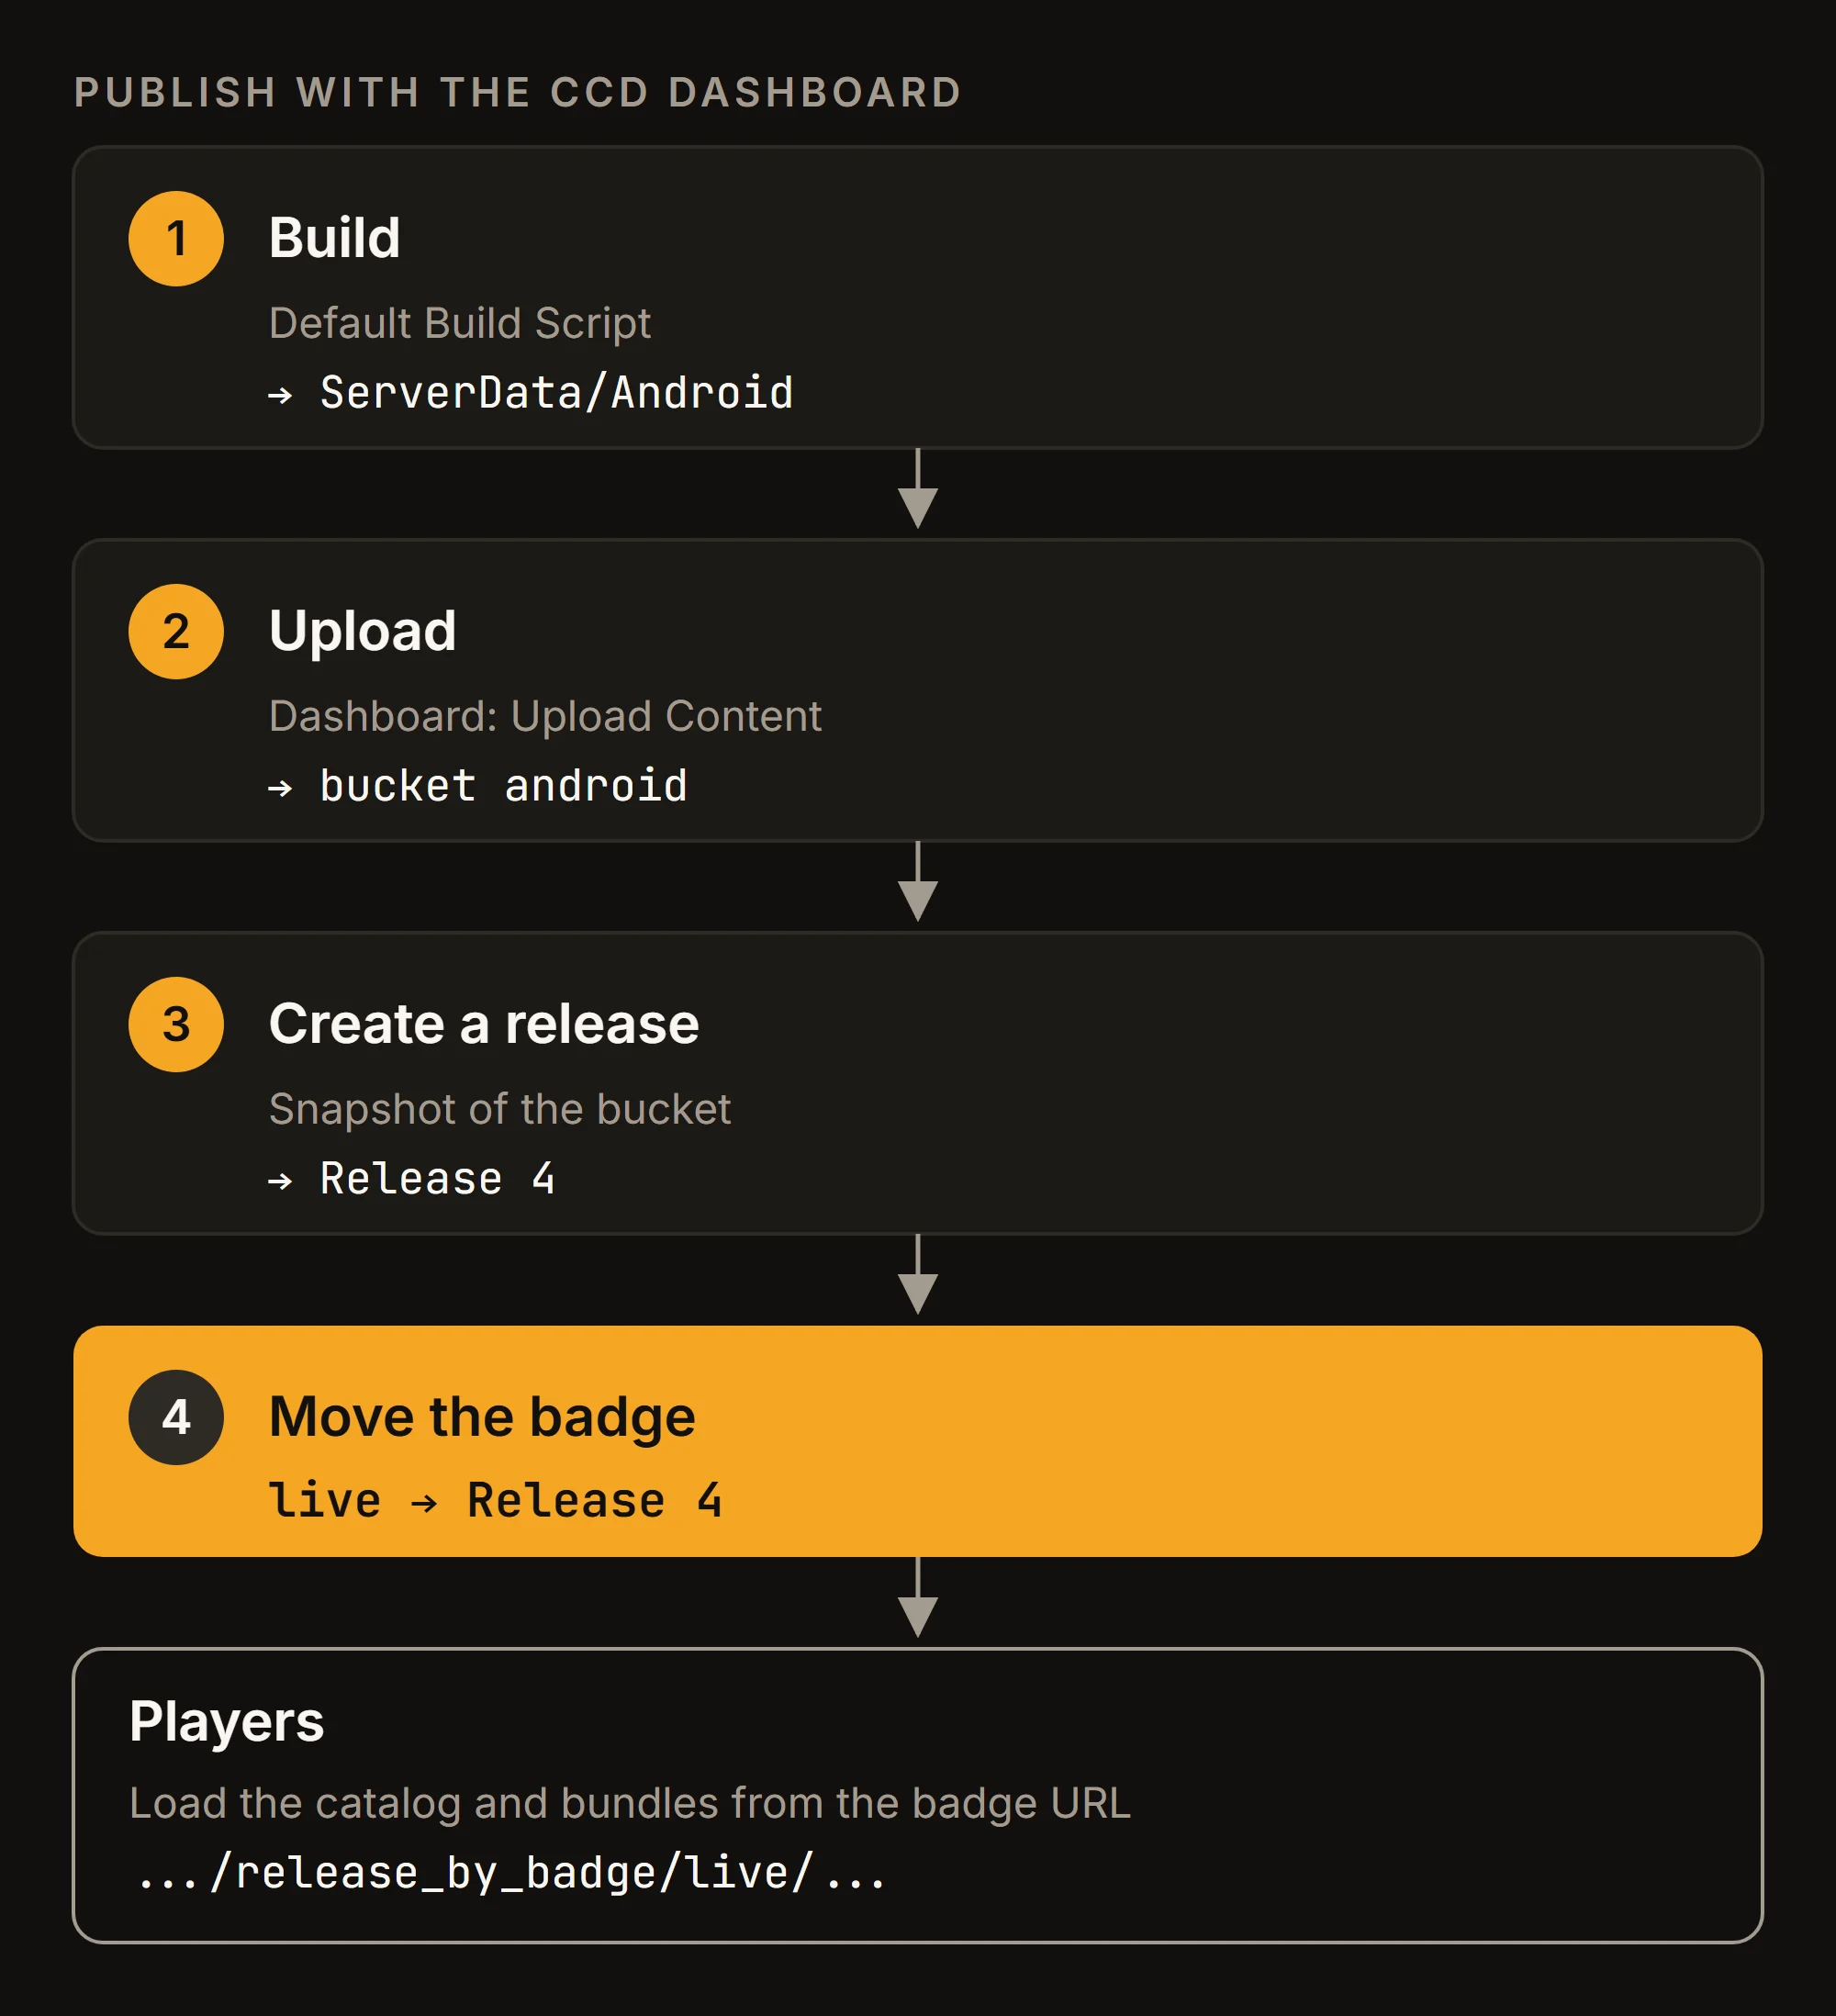
The whole publishing loop looks like this. The bucket android, the badge live and Release 4 are example names; the steps below create each of them.
Make the remote groups and catalog
First, tell Addressables what is remote. As the remote content guide describes:
- Open Window > Asset Management > Addressables > Settings and, in the Catalog section, enable Build Remote Catalog. Set its Build & Load Paths to Remote.
- For each group players should download, set Build & Load Paths to Remote in the group's Inspector.
Without the remote catalog, the app only knows the catalog it shipped with and cannot learn about new content.
Create the bucket and set the load path
In the Unity Dashboard, open your project, then Cloud Content Delivery > Buckets, and select Create Bucket. Make one bucket per platform. Leave bucket privacy off unless you plan to send an access token with every request; you cannot change it after creation.
Next, point the profile at the bucket. In Window > Asset Management > Addressables > Profiles, create a profile for CCD and set its remote load path to the badge URL, in this format (replace each <placeholder> with your values):
https://<ProjectID>.client-api.unity3dusercontent.com/client_api/v1/environments/<EnvironmentName>/buckets/<BucketID>/release_by_badge/<BadgeName>/entry_by_path/content/?path=Before the first upload there is no badge to copy from, so fill in the format yourself: the Bucket ID is shown in the bucket list on the Dashboard, the Project ID is the ID of your Unity Cloud project, the environment is production unless you made another, and the badge name is the one you will create, such as live. Once the badge exists, the Badges table has a button that copies its Addressables URL, so you can check yours. The CCD FAQ recommends the badge URL over a release URL. A badge is a pointer, so moving it to a new release switches players over without a new app build. Make the CCD profile the active one, then run a full content build, since the docs ask for one after the remote load path changes.
The CCD setup page also offers a shortcut: with the Content Delivery Management API package installed, you set the profile's remote location to Cloud Content Delivery and pick the bucket and badge from a list. The CCD publish page adds a Build & Release command from the same package, which uploads, releases and updates the badge for you. This post sticks to the Dashboard.
Upload, release and badge
The build writes the remote files to ServerData/<BuildTarget>: the catalog, its .hash file and the .bundle files. The catalog is binary unless you enable Enable Json Catalog in the settings. Then, following the Dashboard guide:
- Open the bucket and, on the Latest tab, select Upload Content (Upload using the dashboard on an empty bucket).
- Drag in the files from
ServerData/<BuildTarget>and select Upload Files. - On the Latest tab, select Create Release, add a note, choose the badges, and select Submit.
- The first time, open the Badges tab, select Add New, name the badge
live, pick the release and select Submit. For later releases, ticklivein step 3 only when the release should go live at once; otherwise leave it out and move it later from the badge's More Items (⋮) menu.
The badge decides who sees the release. CCD moves latest to every new release on its own, so a release made for testing would reach players at once. That is why I load from a badge of my own, live, and move it only when a release is ready.
Downloading content before play
A player who taps "Play" should not stare at a frozen screen while bundles download. The pre-download guide has two calls for this: GetDownloadSizeAsync returns how many bytes still need to be downloaded (zero when everything is cached), and DownloadDependenciesAsync downloads the bundles into the cache without loading them.
Label everything the first session needs with preload, then run something like this coroutine from the loading screen (here, in a Bootstrap component; the usual using lines are left out):
IEnumerator DownloadPreload(Slider progressBar)
{
    var sizeHandle = Addressables.GetDownloadSizeAsync("preload");
    yield return sizeHandle;
    bool sizeKnown = sizeHandle.Status == AsyncOperationStatus.Succeeded;
    long bytes = sizeKnown ? sizeHandle.Result : -1;
    sizeHandle.Release();
    if (!sizeKnown) yield break; // Offline: show a retry button.
    if (bytes == 0) yield break; // Already cached.

    // Show bytes / (1024f * 1024f) as MB and ask the player first.
    var download = Addressables.DownloadDependenciesAsync("preload");
    while (!download.IsDone)
    {
        progressBar.value = download.GetDownloadStatus().Percent;
        yield return null;
    }
    if (download.Status == AsyncOperationStatus.Failed)
        Debug.LogError($"[{nameof(Bootstrap)}] Preload download failed: {download.OperationException}");
    download.Release();
}
GetDownloadStatus().Percent follows bytes, while PercentComplete follows the number of sub-operations, so the first gives the smoother progress bar. Showing the size first also lets the player wait for Wi-Fi before a large download.
Not everything needs pre-downloading. If most players only ever see part of the content, the same guide suggests downloading it on demand, when it is first loaded.
Shipping content updates
Remote content pays off when you change it after release. Addressables check for a new catalog when they initialize: the app downloads the small .hash file and fetches the catalog again only if the hash changed. New or changed bundles download when they are next loaded or pre-downloaded.
Content updates can only change assets and serialized data. The update build overview is clear that bundles "can't include code changes", so a new script, or a change to the fields of an existing one, still needs a new app build.
Keep the content state file
Every full content build writes addressables_content_state.bin, by default to Assets/AddressableAssetsData/<Platform>. Save the copy from every build you publish, for every platform: commit it with the release, or store it with the build. Without it, the docs warn, you can only make a full content build and a new player, not an update.
Make an update build
When the content changes:
- In the Groups window, run Tools > Check for Content Update Restrictions. For groups with Prevent Updates enabled, it moves changed assets into a new remote group so that only they are downloaded again. The update build page advises making a version control branch before you run it.
- Select Build > Update a Previous Build. It uses the saved content state file and writes a catalog with the same name as the original, so installed apps find it.
- Upload the new files from
ServerData/<BuildTarget>to the bucket, create a release and move the badge, as above.
Prevent Updates suits large groups that rarely change: only the changed assets are downloaded again. Without it, any change rebuilds the whole bundle. Groups that change often are better left without it and kept small.
Check for updates during a session
The automatic check runs when Addressables initialize. To check again later, for example when the player returns to the main menu, enable Only update catalogs manually in the Addressables settings and use the catalog API (the using lines are left out again):
IEnumerator CheckForContentUpdate()
{
    var check = Addressables.CheckForCatalogUpdates(false);
    yield return check;
    List<string> catalogs = check.Status == AsyncOperationStatus.Succeeded ? check.Result : null;
    check.Release();

    if (catalogs != null && catalogs.Count > 0)
        yield return Addressables.UpdateCatalogs(true, catalogs);
}
The first argument of UpdateCatalogs cleans the bundle cache after the update. While it runs, all other Addressables requests wait, so call it at a quiet moment, not in the middle of a match.
Checklist
- Install Addressables, create the settings and commit
AddressableAssetsData. - Give assets short addresses and labels; never keep Addressable assets in
Resources. - Release every handle you load, and pair
InstantiateAsyncwithReleaseInstance. - Group by what loads and unloads together, and run Check Duplicate Bundle Dependencies before each release.
- Test with Use Existing Build and the Addressable Assets Profiler module, not only Use Asset Database.
- Use LZ4 for local groups and LZMA for remote groups, with Build Remote Catalog enabled.
- Load from a CCD badge URL, with one bucket per platform, and use a badge you move by hand when you want to check a release first.
- Save
addressables_content_state.binfor every published build, and ship changes with Update a Previous Build.