

On this page
If you have used Claude Code on a Unity project, you have probably seen both sides of it. It writes a working MonoBehaviour in seconds, then calls an API your Unity version marked obsolete or edits a prefab file by hand.
Most of those mistakes come from missing context: Claude starts every session knowing nothing about your project beyond what you have written down for it, like a brilliant contractor who shows up every morning with no memory of the day before. This post walks through the places where Claude Code lets you write that context down once, then lock it in: project instructions, permissions and plan mode, a connection to the Unity Editor, hooks, sub-agents and skills.
Tested with Unity 6000.3.14f1, Claude Code 2.1.296 and the AI Assistant package (com.unity.ai.assistant) 2.20.0-pre.2. The Unity CLI, Unity's plugin and the hook example follow the official documentation as of October 2026. You need Claude Code installed and a Unity project under Git.
Why Unity projects need configuration
A Unity repository looks like a normal C# codebase, but it has traps that a general-purpose assistant will not guess:
- Every asset has a
.metafile holding its unique ID (GUID). Move or rename a script outside Unity without its.metafile and every reference to it breaks. - Scenes and prefabs are YAML, often thousands of lines long. They are readable, but editing them by hand is fragile, and they burn through the context window.
Library/,Temp/andLogs/are generated. They are huge, useless to read and constantly changing: the junk drawer of every Unity project.- Editor and runtime code must stay apart. Code that uses
UnityEditorhas to live in anEditorfolder or an editor-only assembly definition, or be wrapped in#if UNITY_EDITOR. Otherwise the player build fails. - APIs change between versions. Unity marks methods obsolete and replaces them from one release to the next, so the right call depends on your exact version. For example, Unity 6000.3 removed URP's Compatibility Mode, the setting that let a Scriptable Render Pass skip the render graph API, so a custom render pass written the older way has to be ported to the render graph. Without your version, Claude has to guess.
- The compiler lives in the Editor. Claude edits files on disk, but Unity compiles them. Unless something reports compile errors back, Claude finishes a change without knowing whether it builds.
The sections below close these gaps in layers: what Claude knows, what it is allowed to do, what it can see in the Editor, and what runs automatically.
Project context: CLAUDE.md and rules
CLAUDE.md: the project brief
CLAUDE.md at the repository root is loaded into every session. Treat it as the brief you would give a new teammate on day one: facts Claude cannot reliably infer from the code. The difference is that this teammate actually reads the onboarding doc, every single time.
For a Unity project, that usually means:
- the exact Unity version and render pipeline (Built-in, URP or HDRP)
- the folder layout and which assembly definitions exist
- naming and coding conventions for C#
- how to run tests and what "done" means for a change
- the things Claude must never do
Here is a trimmed example for a mobile project:
# Project brief

- Unity 6000.3, URP. Target platforms: Android and iOS.
- Gameplay code lives in Assets/_Project/Scripts, split into the Game.Runtime,
  Game.Editor and Game.Tests assemblies (.asmdef).
- C#: PascalCase for public members, _camelCase for private fields,
  [SerializeField] private instead of public fields.
- Never edit .unity, .prefab or .asset files by hand; describe the change
  and let me apply it in the Editor.
- Move or rename assets only in the Editor, so their .meta files follow.
- Done = compiles without warnings and EditMode tests pass.
Keep the file short. The official guidance is to stay under about 200 lines, because longer files cost context and are followed less consistently. Run /init to have Claude draft a first version from your codebase, then trim it down to what matters.
You can split a long file with @path imports, such as @docs/architecture.md, but imported files also load at launch. Imports organize the brief; they do not make it cheaper. To save context, use the path-scoped rules below.
Personal preferences that should not be committed go into CLAUDE.local.md, which loads alongside it; add that file to .gitignore.
Path-scoped rules in .claude/rules/
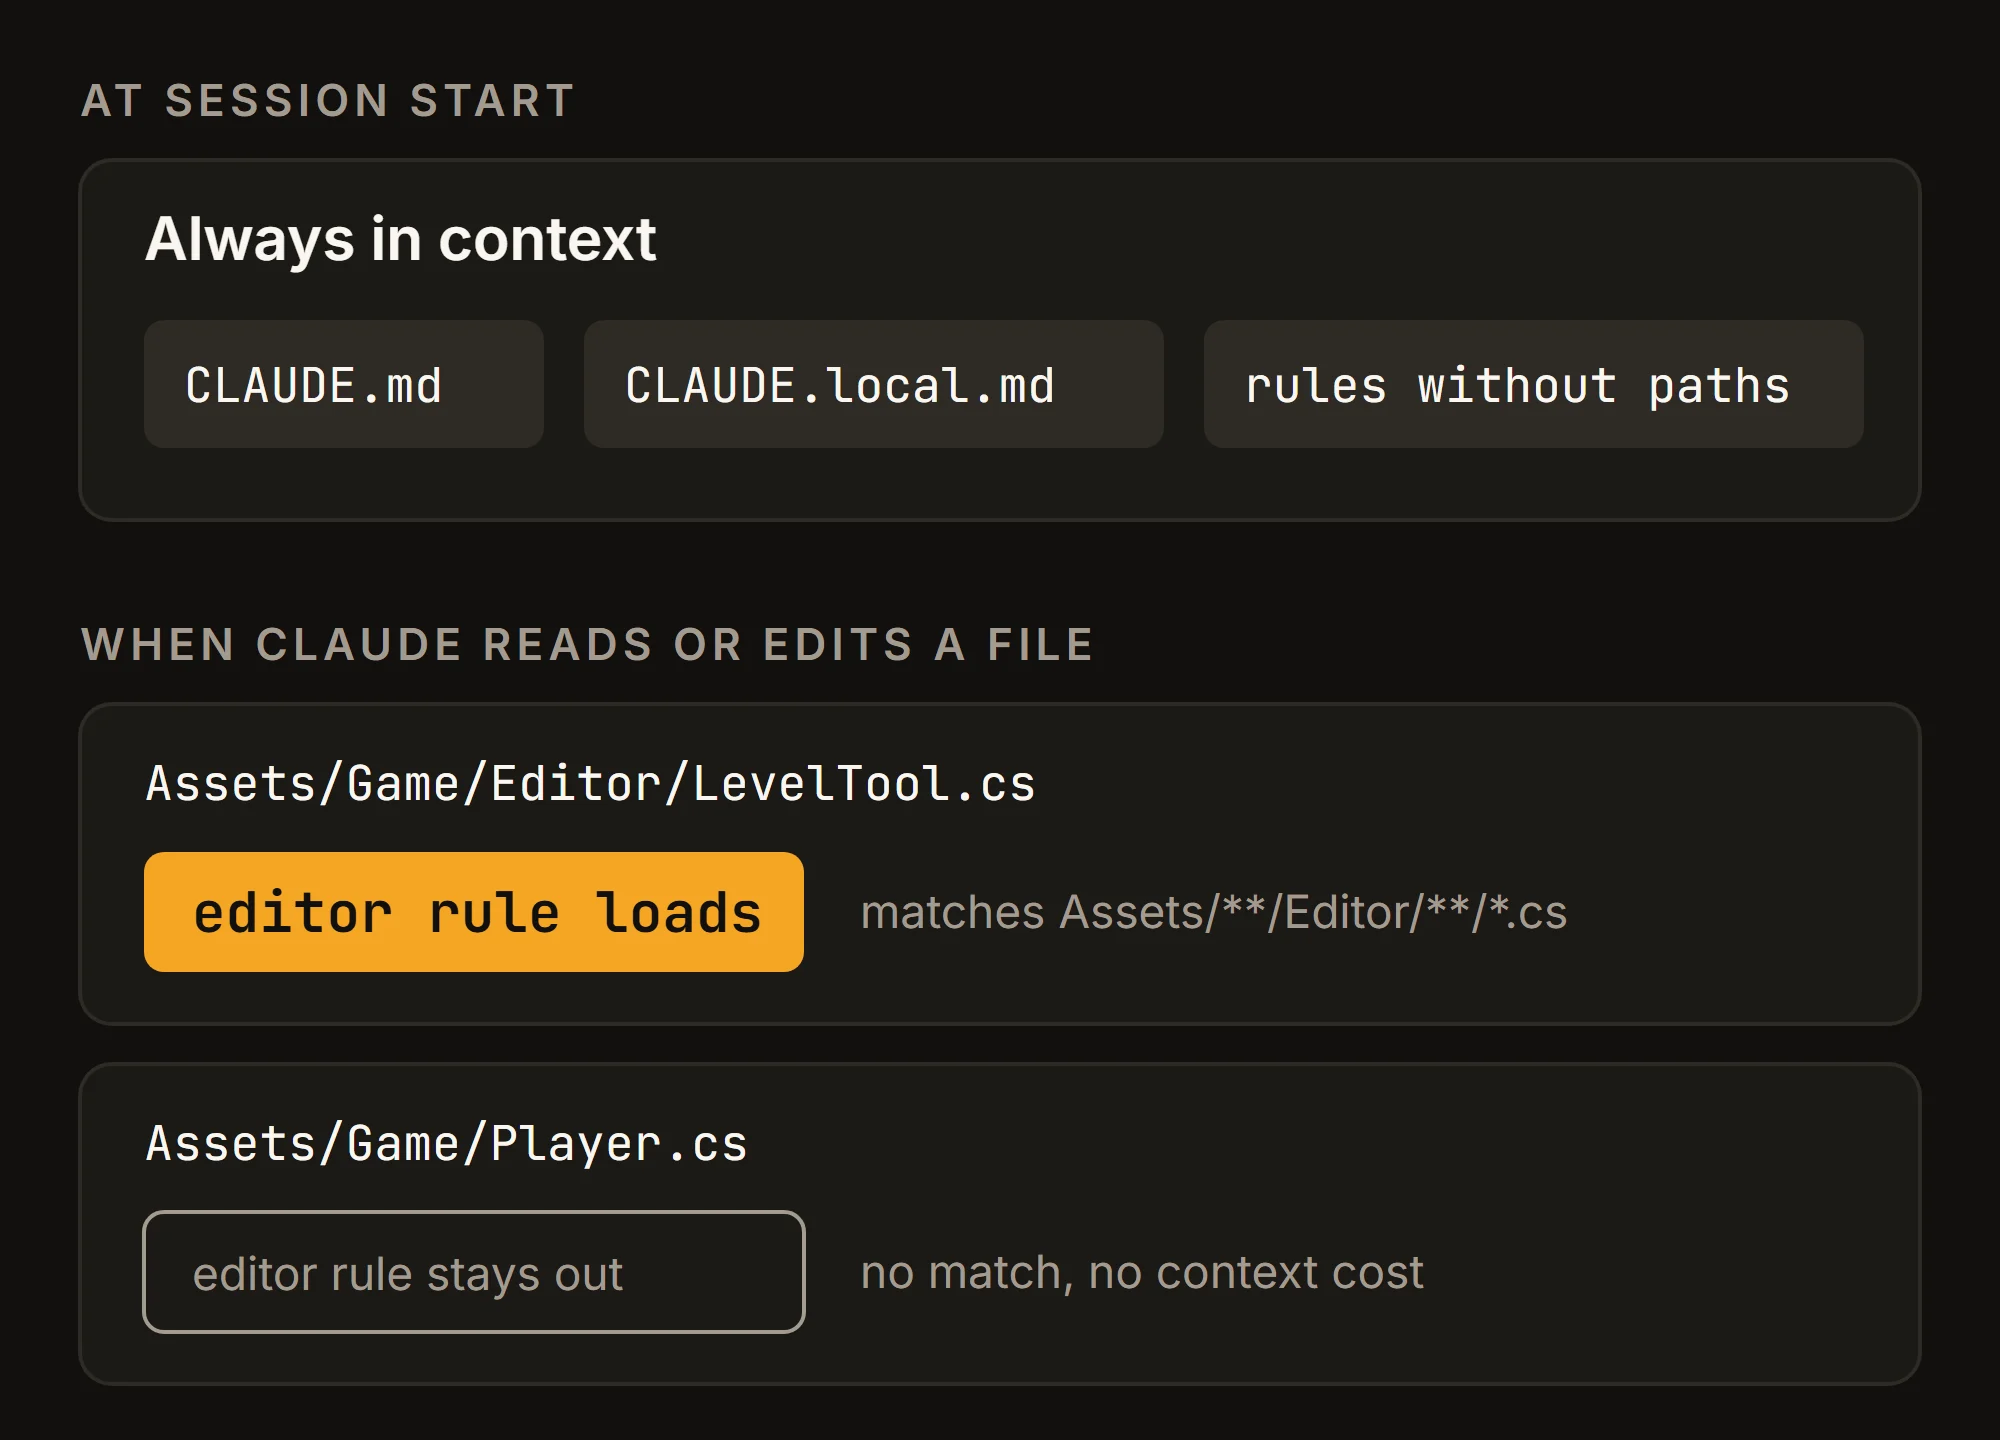
As the brief grows, move topic-specific instructions into Markdown files under .claude/rules/. A rule with a paths field in its frontmatter only loads when Claude reads or edits a matching file, so editor conventions cost no context while Claude works on gameplay code.
For example, a rule for editor scripts:
---
paths:
  - "Assets/**/Editor/**/*.cs"
---

# Editor scripts

- Editor code only. Never reference these types from runtime assemblies.
- Call Undo.RecordObject before changing properties of an object, so the
  change can be undone.
- Use the dedicated Undo methods (Undo.AddComponent,
  Undo.DestroyObjectImmediate, Undo.SetTransformParent) for adding,
  destroying or reparenting.
- Use EditorUtility.SetDirty only for asset changes made without Undo;
  Undo.RecordObject already marks the object dirty.
The Undo calls are listed on the Undo class page, and the EditorUtility.SetDirty page explains why Undo.RecordObject makes a separate SetDirty call unnecessary. The glob only matches folders named Editor. If an editor assembly lives elsewhere, such as Assets/_Project/Scripts/Game.Editor/, add that path to the list.
With that rule in place, only a file that matches pulls it into the conversation:
Good candidates for separate rules in a Unity project:
- Editor tooling: the example above.
- Tests (
Assets/**/Tests/**/*.cs): Unity Test Framework conventions, EditMode versus PlayMode, naming. - Shaders (
**/*.shader,**/*.hlsl): pipeline-specific includes and keyword rules. - UI: whether the project uses UI Toolkit or uGUI, so Claude does not mix them.
Rules without paths load in every session, just like CLAUDE.md. Keep each file to one topic so it is easy to find and update.
Guardrails: permissions and plan mode
Deny rules for generated files and assets
Instructions are context, not enforcement. "Please don't open the junk drawer" is a polite request; a lock is a lock. Add deny rules to .claude/settings.json for folders Claude should never read and for files it should never edit by hand. Claude Code applies them no matter what the model decides:
{
  "permissions": {
    "deny": [
      "Read(./Library/**)",
      "Read(./Temp/**)",
      "Read(./Logs/**)",
      "Read(./UserSettings/**)",
      "Edit(*.unity)",
      "Edit(*.prefab)",
      "Edit(*.asset)",
      "Edit(*.meta)"
    ]
  }
}
The Read rules stop Claude from pulling megabytes of generated data into the conversation. The Edit rules apply to every built-in tool that edits or writes files, and a bare pattern such as *.unity matches at any depth. That backs the "never edit scenes by hand" line in CLAUDE.md with a rule, and keeps Claude from writing .meta files, which Unity creates and maintains itself.
Know the limits, though. Deny rules cover Claude Code's built-in file tools and recognized file commands such as cat and head, but only as a best effort for searches with Grep and Glob, and not at all for a script that opens files on its own. Treat them as a strong guard against accidents, not a sandbox.
Two related habits:
- Commit
.metafiles with their assets. Unity's docs say they must stay with the asset file they relate to, so leaving one out of a commit can break references for everyone who pulls it. - Keep personal exceptions local.
.claude/settings.local.jsonholds your own settings for one project. Claude Code applies it over the shared file and keeps it out of Git when it creates the file; if you create it by hand, add it to.gitignoreyourself.
Plan mode before risky changes
Some changes deserve a look before any file moves: a refactor across several assemblies, a new system that touches scenes, or anything you would review twice in a pull request. Plan mode is built for that. Claude reads files, runs commands to explore and writes a plan, but it does not edit your source until you approve the plan.
Enter it by pressing Shift+Tab in the terminal (the mode indicator in VS Code), by prefixing a single prompt with /plan, or by starting with claude --permission-mode plan. Reviewing a plan takes a minute; untangling a half-finished refactor across three assemblies takes an afternoon.
Connect Claude with the Unity CLI and plugin
Out of the box, Claude Code sees your files but not the running Editor, a bit like fixing a car over the phone. It cannot read the Console, see compile errors as Unity reports them, or inspect the scene hierarchy. Unity now offers several ways to close that gap, and the recommended one changed recently: the MCP server built into the AI Assistant package (com.unity.ai.assistant) is now deprecated, and Unity points to the Unity CLI instead.
The recommended path: Unity CLI
The Unity CLI is free and separate from a Unity AI subscription. The CLI as a whole is still marked experimental, while Unity describes its MCP mode as fully supported. Driving a running Editor through it needs Unity 6.0 LTS or later. These steps follow Unity's migration guide:
- Install the Unity CLI and check it with
unity --version. - Run
unity pipeline installto set up the Unity Pipeline package the CLI uses to talk to the Editor. - Run
unity mcp configure claude, which updates Claude Code's configuration to use the CLI's MCP server.unity mcp configure --listshows the supported clients and their status. - Run
unity skill install <agent-name>, replacing<agent-name>with your agent, to install the skill that teaches it the CLI's commands.
If your project also has the AI Assistant package, update it to 2.13 or later; earlier versions conflict with the CLI.
MCP is not the only way in. Claude Code can run shell commands, and Unity's guide notes that unity command and unity eval drive the Editor directly, without MCP in between, and are faster and use fewer tokens. unity status shows which Editors the CLI can reach, and the CLI reference lists the other commands. MCP mode remains for agents that cannot run shell commands.
Unity's plugin for Claude Code
Unity also publishes a plugin for Claude Code that adds a set of Unity skills. Install it from inside a Claude Code session:
/plugin marketplace add Unity-Technologies/unity-agent-plugin
/plugin install unity@unity-agent-plugin
The VS Code extension does not have the /plugin commands; type /plugins there to open the plugin manager. You choose a scope while installing: user for all your projects, project to share it with everyone in the repository, or local for yourself in this repository only. Type /unity: to list the skills it adds.
The plugin ships skills only, no MCP server. Skills that control the Editor run Unity CLI commands, so they need the CLI, the Pipeline package and an open Editor.
Unity is frank about its limits: on Sonnet 5 the plugin "mainly supplies correctness", because Sonnet 5 builds most Unity features without it but "defaults to older approaches". That is the version trap from the start of this post, handled by Unity itself. For simple uGUI work, the docs say it makes little difference.
MCP servers: Unity's in-Editor and third-party
MCP (Model Context Protocol) is the standard way to expose tools that Claude can call. The diagram shows the two Unity routes that use it: the CLI's unity mcp from the previous section, and the deprecated in-Editor server.

What I use today: the in-Editor MCP server
On my Unity 6000.3 projects I still connect through the in-Editor server from com.unity.ai.assistant, which works on Unity 6 (6000.0) and later. Its bridge starts with the Editor, and its relay binary lives in ~/.unity/relay/. I register it in a project-scoped .mcp.json at the repository root, so it is shared through version control:
{
  "mcpServers": {
    "unity-mcp": {
      "type": "stdio",
      "command": "${USERPROFILE}/.unity/relay/relay_win.exe",
      "args": ["--mcp"]
    }
  }
}
This is the Windows binary; Unity's MCP setup page, linked above, lists the relay for macOS and Linux. Claude Code expands ${USERPROFILE} in command, so the same file works for every Windows user without a hard-coded path.
In an interactive session, Claude Code asks you to approve the project's server the first time. Unity then lists the client under Pending Connections in Project Settings → AI → Unity MCP Server, where you select Allow. After that, the server shows as connected in /mcp, and Claude can call tools such as Unity.ManageScene. Because this server is deprecated, plan a move to the CLI rather than building new setups on it.
Once allowed, Claude Code is listed under Connected Clients as Accepted. Unity flags it as unsigned or not recognized, and lists what it may now do in the Editor: execute Editor commands, modify scenes and GameObjects, create and edit scripts, and access all project files and assets.

Third-party MCP packages
Unity's deprecation covers only its own in-Editor server; third-party MCP packages from GitHub are unaffected. One example is MCP for Unity from CoplayDev, an MIT-licensed bridge maintained by Aura and not affiliated with Unity. Its README lists Unity 2021.3 LTS through 6.x, Python 3.10 or later, installation through the Package Manager from a Git URL, and Claude Code among its clients. That version range matters if your project is older than Unity 6.0, the minimum the CLI needs to drive a running Editor.
Whichever route you take, treat Editor tools with the same care as any automation that can change scenes. Read the tool list before enabling a server, commit your work before letting Claude modify scenes, and keep "never edit scenes by hand" in CLAUDE.md together with its deny rules, so changes go through the Editor's own APIs.
Hooks: check every edit
Deny rules stop actions; hooks add them. A hook is a shell command that Claude Code runs at a fixed point, such as right after a tool call, so it happens every time instead of whenever Claude remembers. In a Unity project, the most useful one closes the compile-error gap: after Claude edits a C# file, recompile and show Claude the result.
With the Unity CLI installed and the Editor open, add this to .claude/settings.json:
{
  "hooks": {
    "PostToolUse": [
      {
        "matcher": "Edit|Write",
        "hooks": [
          {
            "type": "command",
            "if": "Edit(*.cs)",
            "command": "unity recompile 1>&2 || exit 2"
          }
        ]
      }
    ]
  }
}
How it works:
- When it runs.
PostToolUsewith theEdit|Writematcher fires after Claude edits or writes a file. Theiffield accepts the same patterns as permission rules, and anEditrule covers every built-in tool that edits files, soEdit(*.cs)should limit the hook to C# files, new ones included. - What it runs.
unity recompilerecompiles a running Editor's scripts and reports compile errors, without a full build. - How Claude sees errors. For a
PostToolUsehook, exit code 2 shows the hook's stderr to Claude; the edit itself has already happened.1>&2 || exit 2sends the recompile output there when the command exits non-zero. It also fails when no Editor is running, so Claude sees that message too. - Test it once. The CLI reference does not document the exit code for compile errors. Ask Claude to create a new script with a deliberate syntax error, and check that the error comes back to Claude.
- Which shell. The command uses bash syntax. On Windows, Claude Code runs hooks with Git Bash, or with PowerShell when Git Bash is not installed.
Run /hooks to confirm the hook is registered. To block an action with logic that a deny rule cannot express, use a PreToolUse hook that exits with code 2 instead; the docs' "Block edits to protected files" example is a good starting point.
Sub-agents for focused work
A sub-agent is a specialist Claude can hand a task to, the way you might send an intern to read a 400-page manual and come back with the three lines that matter. It runs in its own context window with its own system prompt and tool access, and only its final summary comes back to the main conversation. That makes sub-agents a good fit for work that produces a lot of output, such as reviewing a large diff or digging through documentation.
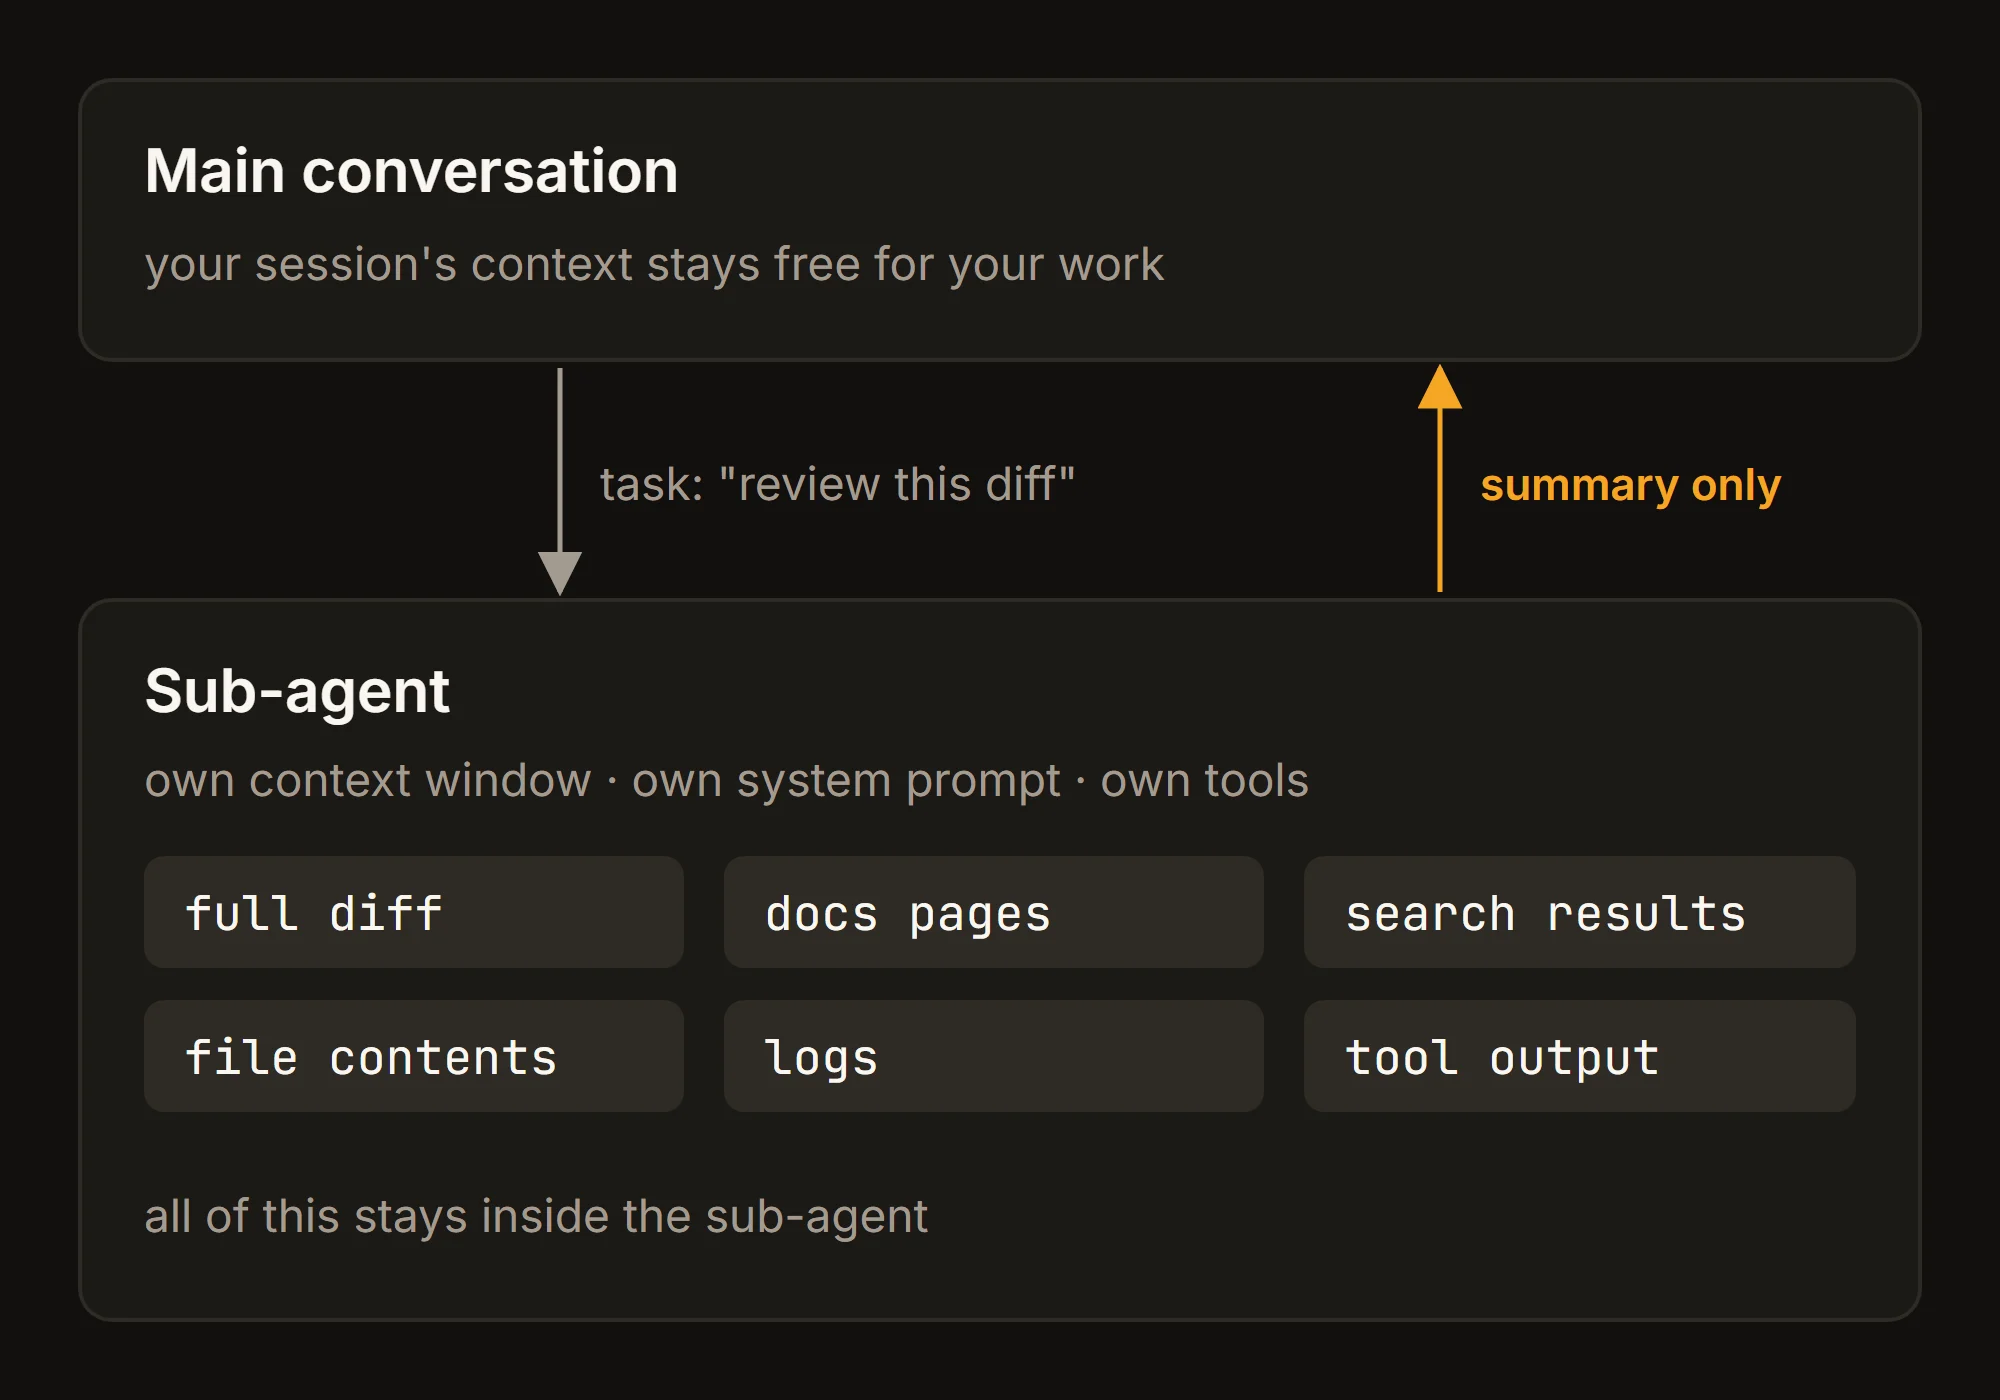
Project sub-agents live in .claude/agents/ as Markdown files. Only name and description are required; the description is what Claude uses to decide when to delegate. For example, a read-only reviewer:
---
name: unity-code-reviewer
description: Reviews C# changes in this Unity project. Use proactively after gameplay or editor code changes.
tools: Read, Grep, Glob
model: sonnet
---

You review C# code in a Unity project. Check for: allocations in Update loops,
missing null checks on serialized references, UnityEditor usage outside editor
assemblies, obsolete APIs for the project's Unity version, and missing .meta
handling when files are moved. Report findings by severity with file and line.
Useful agents for a Unity team include a code reviewer like this one, a test writer that knows your Unity Test Framework conventions, and a researcher that reads Unity documentation and release notes so that work stays out of your main session. Limiting tools to read-only access makes a reviewer safe to run often. Without Bash it cannot run git diff itself, so name the changed files when you hand it the task.
Skills for repeatable workflows
Some tasks follow the same steps every time: running the test suite, scaffolding a new feature folder with its assembly definition, preparing a build. A skill packages those steps so you can trigger them with one command.
A project skill is a folder in .claude/skills/ with a SKILL.md file. Its frontmatter description tells Claude what it does, and you run it as /<name>. Setting disable-model-invocation: true means it only runs when you type it, which is what you want for anything with side effects. Here is one that runs the EditMode tests; replace <path to Unity> with the Editor executable for your project's version:
---
name: unity-tests
description: Run the EditMode test suite in batch mode and summarize failures.
disable-model-invocation: true
---

1. Make sure the project is not open in the Unity Editor; batch mode cannot
   open a project that is already open.
2. Run this as a single command:
   "<path to Unity>" -batchmode -projectPath . -runTests -testPlatform EditMode -testResults ./TestResults/editmode.xml -logFile -
3. Read TestResults/editmode.xml and list each failing test with its message
   and the most likely cause in our code.
Leave out -quit: combined with -runTests, it can close the Editor before the tests finish.
With the Unity CLI, unity test is an alternative to the raw Editor command. It runs Edit Mode and Play Mode tests through the Editor test runner and writes an NUnit report, and its exit code tells the two failures apart: 8 means tests failed, 6 means the run never finished, for example because of a compile error.
unity watch test re-runs the affected tests whenever files change. Check unity test --help for its options before you build a skill on it.
Start with the one workflow you repeat most. If you find yourself typing the same multi-step instructions into the chat for the third time, that is a skill waiting to be written.
Checklist
- Project brief. Run
/init, then cutCLAUDE.mddown to your Unity version, render pipeline, layout, conventions and test command. - Path-scoped rules. Move editor, test and shader conventions into rules in
.claude/rules/. - Deny rules. Deny
ReadonLibrary/,Temp/,Logs/andUserSettings/, andEditon scenes, prefabs,.assetand.metafiles. - Plan first. Use plan mode for refactors across assemblies and anything that touches scenes.
- Editor connection. Set up the Unity CLI (
unity mcp configure claude, orunity commandfrom the shell), and add Unity's plugin if you want its skills. - Compile check. Add a
PostToolUsehook that runsunity recompileafter C# edits. - Reviewer. Add a read-only code reviewer in
.claude/agents/. - First skill. Turn your most repeated task into a skill, starting with running tests.
None of these files need to be perfect on day one. Commit them with the project, and update them whenever Claude makes the same mistake twice.